On This Page
Today, we will explore how to build an editable table in React.js; a crucial topic for React developers.
In the ReactJS section of Codevertiser, we have already covered some essential React topics, such as handling forms, creating a quiz app, and many others.
Demo App
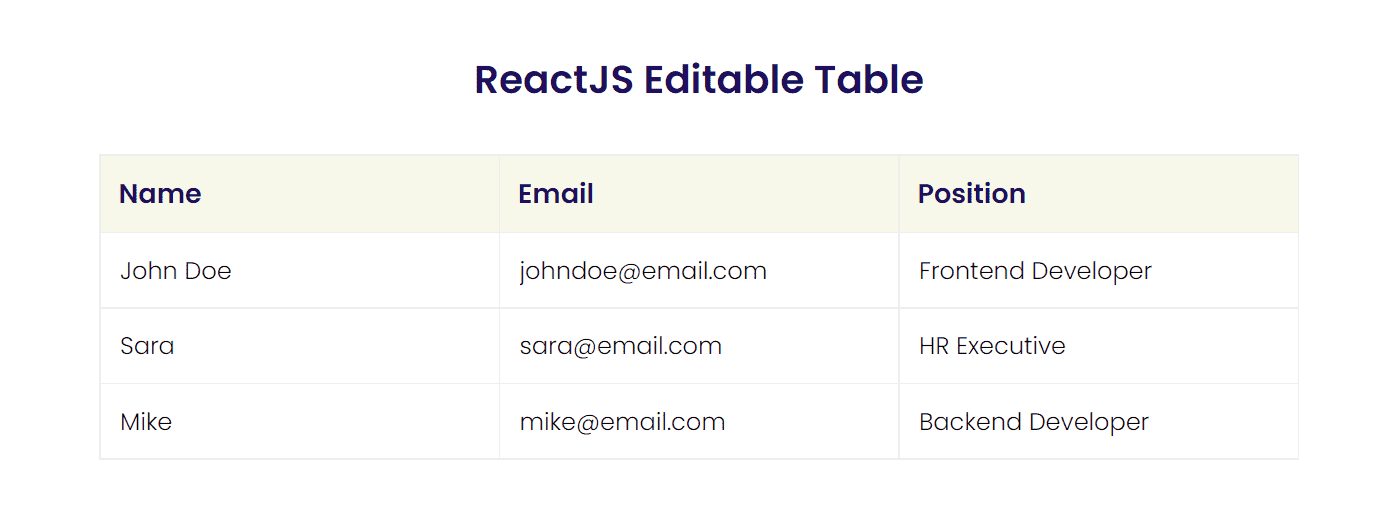
This is a Demo App of what we are about to learn and build in this article, you can play with it.
| Name | Position | |
|---|---|---|
Editable text fields in a table enhance the user experience of a React App. It might seem difficult to build, but it becomes easy with the right tricks. There are many ways to create them, but I’ll share the easiest one, so you can do it without getting exhausted. Let's get started.
Codepen Demo | Editable Table
If you are only interested in code, you can find it below on the Codepen widget. However, if you want to learn how to build it step by step, follow the article.
Creating the Editable Text field in Table
Step 01: Create Table
In the first step, create a simple table like we do with plain HTML5. A simple table is created to make the base for the editable text fields. After building the table, we will turn the Table Data: td into an editable text.
function EditableTable() {return (<div><table><thead><tr><th>Name</th><th>Email</th><th>Position</th></tr></thead><tbody><tr><td>John Doe</td><td>johndoe@email.com</td><td>Frontend Developer</td></tr><tr><td>Sara</td><td>sara@email.com</td><td>HR Executive</td></tr><tr><td>Mike</td><td>mike@email.com</td><td>Backend Developer Developer</td></tr></tbody></table></div>)}export default EditableTable
Now we have to figure out how to turn this td: table data into editable field.
The first thing that came into mind is to wrap input inside td.
Let’s make the code clean
Before moving to Editable Text Field let’s make this component a bit cleaner.
In real-world apps, we get data via APIs. So to mock it, we will build an array of objects.
import { useState } from 'react'const data = [{id: '01',name: 'John Doe',email: 'johndoe@email.com',position: 'Frontend Developer',},{id: '02',name: 'Sara',email: 'sara@email.com',position: 'HR Executive',},{id: '03',name: 'Mike',email: 'mike@email.com',position: 'Backend Developer',},]const EditableTable = () => {const [employeeData, setEmployeeData] = useState(data)return (<div><table><thead><tr><th>Name</th><th>Email</th><th>Position</th></tr></thead><tbody>{employeeData.map(({ id, name, email, position }) => (<tr key={id}><td>{name}</td><td>{email}</td><td>{position}</td></tr>))}</tbody></table></div>)}export default EditableTable
Step 02: Editable Table Data
The primary option that comes to mind for making editable table data is wrapping the td tag into the input tag. Let us do this first.
<tbody>{employeeData.map(({ employeeId, name, email, position }) => (<tr key={employeeId}><td><inputname="name"value={name}type="text"onChange={onChangeInput}placeholder="Type Name"/></td><td><inputname="email"value={email}type="text"onChange={onChangeInput}placeholder="Type Email"/></td><td><inputname="position"type="text"value={position}onChange={onChangeInput}placeholder="Type Position"/></td></tr>))}</tbody>
But here is one problem…
Now observe that the editable text field is not yet functional. In the next step, we will make it functional.
Step 03: Changing Table data Value
We have to write an onChange Handler Function for changing the table data value. This function is to handle the Input tag.
import { useState } from 'react'import './index.css'const data = [{employeeId: '01',name: 'John Doe',email: 'johndoe@email.com',position: 'Frontend Developer',},{employeeId: '02',name: 'Sara',email: 'sara@email.com',position: 'HR Executive',},{employeeId: '03',name: 'Mike',email: 'mike@email.com',position: 'Backend Developer',},]const EditableTable = () => {const [employeeData, setEmployeeData] = useState(data)const onChangeInput = (e, employeeId) => {const { name, value } = e.targetconsole.log('name', name)console.log('value', value)console.log('employeeId', employeeId)const editData = employeeData.map((item) =>item.employeeId === employeeId && name ? { ...item, [name]: value } : item)console.log('editData', editData)setEmployeeData(editData)}return (<div className="container"><h1 className="title">ReactJS Editable Table</h1><table><thead><tr><th>Name</th><th>Email</th><th>Position</th></tr></thead><tbody>{employeeData.map(({ employeeId, name, email, position }) => (<tr key={employeeId}><td><inputname="name"value={name}type="text"onChange={(e) => onChangeInput(e, employeeId)}placeholder="Type Name"/></td><td><inputname="email"value={email}type="text"onChange={(e) => onChangeInput(e, employeeId)}placeholder="Type Email"/></td><td><inputname="position"type="text"value={position}onChange={(e) => onChangeInput(e, employeeId)}placeholder="Type Position"/></td></tr>))}</tbody></table></div>)}export default EditableTable
Now the main part,
const onChangeInput = (e, employeeId) => {const { name, value } = e.targetconsole.log('name', name)console.log('value', value)console.log('employeeId', employeeId)const editData = employeeData.map((item) =>item.employeeId === employeeId && name ? { ...item, [name]: value } : item)console.log('editData', editData)setEmployeeData(editData)}
You can see we have multiple consoles in this function, to debug that are we getting correct values.
Then we map over employeeData and check if the current employeeId equals to the id, and name also matches with name of input, we will change only that input values, the rest of the values will be the same.
To complete, we will setState and pass editData to it.
Read More On This
The article "Reusable Input Component in React" will help you understand how to build an input component in React with TypeScrip.
For insights on effectively updating objects within an array, refer to the article "How to Update an Array of Objects".
These resources will help you deepen your understanding of this topic.
Congrats, you have created the table with editable text fields.
What about making it stylish and interactive?
Styling the Editable Text fields in the Table
For interactivity, I added the hover effect, on a text field, so user can know he can interact with it.
We also removed the default border and styled input focus state, to make the user experience smooth.
Complete Code
import { useState } from 'react'import './index.css'const data = [{employeeId: '01',name: 'John Doe',email: 'johndoe@email.com',position: 'Frontend Developer',},{employeeId: '02',name: 'Sara',email: 'sara@email.com',position: 'HR Executive',},{employeeId: '03',name: 'Mike',email: 'mike@email.com',position: 'Backend Developer',},]const EditableTable = () => {const [employeeData, setEmployeeData] = useState(data)const onChangeInput = (e, employeeId) => {const { name, value } = e.targetconst editData = employeeData.map((item) =>item.employeeId === employeeId && name ? { ...item, [name]: value } : item)setEmployeeData(editData)}return (<div className="container"><h1 className="title">ReactJS Editable Table</h1><table><thead><tr><th>Name</th><th>Email</th><th>Position</th></tr></thead><tbody>{employeeData.map(({ employeeId, name, email, position }) => (<tr key={employeeId}><td><inputname="name"value={name}type="text"onChange={(e) => onChangeInput(e, employeeId)}placeholder="Type Name"/></td><td><inputname="email"value={email}type="text"onChange={(e) => onChangeInput(e, employeeId)}placeholder="Type Email"/></td><td><inputname="position"type="text"value={position}onChange={(e) => onChangeInput(e, employeeId)}placeholder="Type Position"/></td></tr>))}</tbody></table></div>)}export default EditableTable
CSS
@import url('https://fonts.googleapis.com/css2?family=Poppins:wght@300;600&display=swap');body {box-sizing: border-box;color: #220f5f;font-family: 'Poppins', sans-serif;}.container {width: 100%;max-width: 800px;padding: 0 10px;margin: 0 auto;margin-top: 70px;}.title {text-align: center;font-size: 26px;margin-bottom: 30px;}table {border-collapse: collapse;width: 100%;}tr th {font-size: 18px;padding: 12px;border: 1px solid #eeeeee;text-align: left;background-color: rgba(217, 221, 146, 0.2);}tr td {border: 1px solid #eeeeee;text-align: left;}input {font-size: 16px;background-color: transparent;border: none;width: 91%;padding: 12px 12px;font-family: 'Poppins', sans-serif;}input:hover {background-color: #fffaf3;}input:focus {outline: 1px solid #ccc;border: 1px solid #ccc;}
I hope you find this article valuable.
